Hi fren,
these are brads... they're also called as paper fasteners.
A brad is a type of embellishment, used as a decoration for card making or scrap booking. They are usually inexpensive embellishments and require no special tools.
A brad has 2 prongs (the legs or the parts that stick out). How to use a brad? First, punch a small hole or use a sharp cutter to slit through your card or paper, just a little, so that the prongs can go through it. Then, push the prongs through the slit/hole and split the prongs apart. That way, the brad is attached securely to the paper.
There are many types of brads in various colours, shapes, sizes and materials. As long as it has 2 prongs, it's called a brad. I love using brads in my card-making because it is easy to use and it give dimension to the card. You can use brads to layer your cards or to attach flowers to it, like i did in my minnie mouse pic frame.
Saturday, November 28, 2009
Thursday, November 26, 2009
minnie mouse
My daughter loves Minnie Mouse so much... so, when i got a great picture of it, i put it into a DIY decorative frame. Here is what i did to the picture :

As the photo size is far smaller than the frame, i add another card to make dimension for the background. So it look larger than the original size. For the left and right side of the pic, i add doily (decorative lacy mat that's put on plate under food to display attractively).
For the upper left corner, i add decorative ribbon, top up with felt cloth flower and brads at the center to fasten the photo with the background.
For the bottom frame, i use 3D stickers ( i love bubble stickers so much..hehe...) on the top of lace ribbon and deco ribbon. Lastly, i put it into a frame.
Like it ? You can start decorate your own photo today.
I'll be doing some craft findings for all craft lovers. In the near future, you can visit my e-store for the decorative embellishment to beautify your art & craft projects.
Come back frequently to check it out. Have a good day !!!
Saturday, November 21, 2009
B'day card 4 my hubby
i always love to do cardmaking... when my hub's birthday is coming..i surprised him with my handmade card..
here is the card's cover

take a look of the inside ...
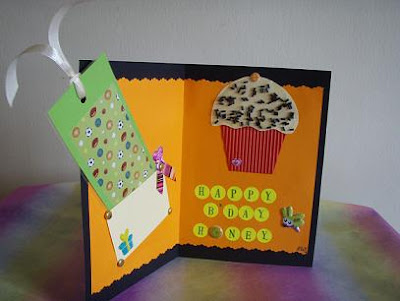
I used corrugated card for the cupcake. Decorated it with beads, so looks like chocolate chips. Add lots of 3D bubble stickers. And also stamped birthday greeting....
For the left side of the card, i made small envelope folder to keep the bookmark. As my hubby loves to read, i enclosed it with my handmade bookmark. I chose balls theme for the background.
this is the front side...
how do you like my card?
Feel free to give any comment.
here is the card's cover

For the left side of the card, i made small envelope folder to keep the bookmark. As my hubby loves to read, i enclosed it with my handmade bookmark. I chose balls theme for the background.
this is the front side...
I used self adhesive plastic film to laminate my bookmark, so it's more long lasting
Final touch, a ribbon at the handle
(I ran out of eyelet... actually wanna add it to be more pro looking..hehe)
how do you like my card?
Feel free to give any comment.
Thursday, November 19, 2009
my cardbanner
hi guys,
this is what i did for my banner. Unfamiliar with digital setting, i made it by card.
I put polka dot sticker as the base (u'll find out i love polka dot design so much..hehe..)
Then add some greetings, design it with lace and beads. I use felt cloth for the flower at the right side above.
For the title, i stamped the alphabet into the round sticker, E for Elly, so, i made it more visible and big..hehe... and i also add button for the O..
Hope you like it as i do !!!
Tuesday, November 17, 2009
My B-Day card
2 weeks ago, i created a B-day card for my own. I always love to do card making. This year a bit busier, i only did 3 cards till now, 1 for my mom, 1 for my mom in law, and 1 for myself.
Here is the cover
And the inside is tadaaa...
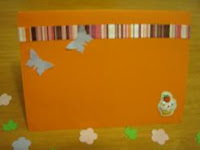
I have lots of decorative craft punch, this time i use flower and butterfly
I use the 3D fold method, add some embellisment, and stamp for the alphabet greetings.
Finally, add some 3D bubble stickers.
Happy Birthday to me !!!! hehe...
Here is the cover
And the inside is tadaaa...
I have lots of decorative craft punch, this time i use flower and butterfly
I use the 3D fold method, add some embellisment, and stamp for the alphabet greetings.
Finally, add some 3D bubble stickers.
Happy Birthday to me !!!! hehe...
Decorative square tin
 People always love free gift, no matter it's small or big. I collect lots of container as a free gift. A few months back, i had free tin from Lipton Tea. I used it to store my ribbons and beads. But then, i found it too commercial, i want mine to be more personalised, more like my style, so i decided to wrap it up.
 Here, i let you see how it look before wrapped
And this is affter the wrapping
I use yellow polka dot felt cloth to wrap the side of the tin. After that, for the top of it, i glued lace around the corner. Then top up with the same pattern of the felt cloth.
I like to use felt cloth for my design. It's more thick than fabric, but also more softer than card or paper. Wallpaper is also a good alternative.
How do you like my design ?
Feel free to give any comment.
Monday, November 16, 2009
Decorative storages from recycled items ( round box )
I love to keep things, no matter they're boxes, containers, maps, tickets, whatever i can recycle to a brand new items. This time, i like to share my own storages which i made from recycled items.
Here is i use The Body Shop Body Butter container. I use blue polka dot felt cloth as the wrapping base. Then add lace for the corner to give more feminime look. For embellisment, i add beads and matching color ribbon.
Hope you like it !
Subscribe to:
Comments (Atom)


